Feeds:
Posts
Comments

Archive for the ‘diy’ Category

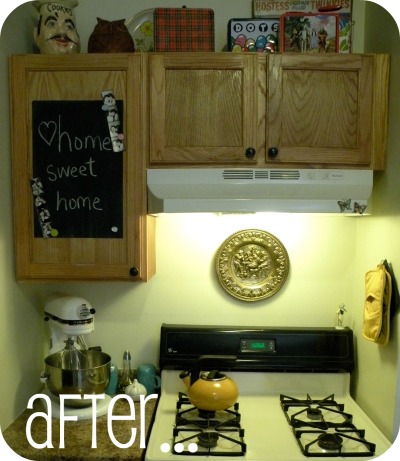
oh the woes of apartment dwelling! do lease restrictions on sprucing up your temporary home leave you feeling less than inspired? often times apartments and rentals limit you to blandly painted walls, trim that has seen better days, and garish kitchen cabinetry. we can so relate!  locked into similarly limiting leases ourselves, lexi and i are constantly brainstorming ways to personalize our abodes with the least lasting impact. thank goodness for chalkboard paint!

you need:

~a piece of magnetic sheet metal cut to fit your cabinet. i had a 12″x 18″ piece lying around that i scored at a salvage shop eons ago but you should be able to find sheet metal at Lowe’s and Home Depot. (here’s a hot tip: call your local heating and air company. they might have sheet metal scraps lying around that they’ll sell you on the cheap!)

~chalkboard paint. we heart rust-oleam’s writable-erasable latex paint!

~ 3M double coated tape. or a similar adhesive that will ensure your chalkboard is fixed to your cabinet strongly but not permanently!


to do:

1. paint the magnetic sheet metal with an even coat of chalkboard paint. apply another coat if it looks like it needs it, letting paint dry in between and after each coat.

2. stick a piece of double coated tape on the back corners of the metal sheet.

3. press your new chalkboard firmly into place on the cabinet door your choosing. all done!

use your new chalkboard for grocery lists, hanging pictures and souvenirs, or just as a place to leave a message for house guests. come up with a twist on this idea? let us know; we’d love to hear from you!

xo

lo & lexi

Read Full Post »

spring is so in the air! can you feel it? something about the impending sunny weather is really bringing out our inner flower child. we are digging on anything and everything earthy, flowing, feathery, and ethereal. and nothing encompasses “love-in” more than dream catchers!

you need: 

~thread

~a twig from your yard (about a foot long)

~ feathers (your local craft store will sell packages in a plethora of pretty colors!)

here’s how:

this project was so super simple.  cut a few pieces of thread in various lengths.  tie feathers along each string making sure to double knot the thread around the stem of the feather.  don’t worry too much about evenly spacing the feathers.  the more random, the better your dream catcher will look in the end! now loop each feather-covered thread around the twig and tie securely.  once again, don’t worry about evenly spacing the thread. cut a longer piece of thread, tie it to either end of the twig, and use this loop to hang your new so dreamy dream catcher!

sweet dreams! xo. Lexi and Lo

Read Full Post »

get hung up

a knotted pile of necklaces, a crazed heap of scarves, or a closet full of hoodies that are acting as floor covering can all be filed under “mildly annoying things that are happening in my bedroom”. fortunately, we have a super cute, terribly easy solution for you.

i was thrifting in Michigan a few weeks ago and picked up these cool doorknobs and doorknob face plates. i handed them over to lo, who grabbed some paint, some epoxy, and turned these discarded pieces into a really adorable way to hang whatever it is you need to hang. i found these at a “junk” store, but you can pick things like this up at salvage places (check out salvage one in Chicago if you have a chance…it’s dreamy). the epoxy for attaching the knobs to the plates can be found at any hardware store.

try making a bunch of these and hanging them in a row- instant coat rack! have fun, try something new, and just don’t epoxy your fingers together. have a great weekend darlings!

xoxo lexi and lo

Read Full Post »

xoxo and an extra xo

Valentine’s Day is just around the corner! what better way to celebrate a holiday that’s all about showing the people you love that you love them than to share some things we love with you!? in the days leading up to v-day, we’ll be sharing some tasty vegan treats, holiday inspired style, and oh so lovely DIYs for decorating your home. we have something extra special planned for the 14th, and we’re just so excited to share all of the fun along the way!

but first….

DIY chalkboard serving trays:

these chalkboard serving trays were just about the easiest DIY we have ever DIY-ed. they add such a special touch to what ever you might be serving up at your next soiree.

what you need:

~chalkboard paint

~silver serving trays (we found a bunch at our local thrift for under $4 each!)

layer on the chalkboard paint until your tray is covered.

let each layer dry about ten minutes between coats.

you’re done!  how easy was that?  now serve up some special valentine’s treats for those special someones in your life!

Read Full Post »

neon lace

remember back in december when we made super simple and super cute painted lace ornaments? well, we loved them so much we just weren’t ready to part ways with them after the holidays. so we took the idea and ran! hang these hoops above your dining table at your next soiree or in a window for an oh so lovely dappled sunlight effect. aren’t they romantic?

supplies:

~ wooden embroidery hoops in various diameters (we recommend at least three different sizes)

~ spray paint in your favorite colors (once again, we think a palate of three different color keeps it interesting)

~ lace (we used doilies!)

here’s what to do:

step 1: fit your lace in the embroidery hoop making sure to keep the lace taught as you tighten the hoop ~ step 2: trim the excess edges of lace ~ step 3: spray an even coat of paint using a back and forth motion across the front and sides of the hoop ~ step 4: wait for the front to dry (about 5 minutes).  then turn over and repeat step 3 on the back side of the hoop. now repeat on the other embroidery hoops and hang where ever your heart desires! we love the way light filters through them when hung in a window.

Read Full Post »

bleh. new year’s resolutions.  just the thought of them make us cringe.  resolutions always tend to focus on the negative but we have resolved to focus on all things positive in 2012.  and that is exactly the idea behind this paper chain. add a new and positive habit to your life, one month at a time. here’s how it works:

create a paper chain of new years resolutions.  each link of the chain represents a month of the year. each month you will  challenge yourself to try something new, step out of your comfort zone, or finally get around to doing something you’ve always wanted to do. whether your resolution is life changingly big or super simple and small, you’re bound to feel a few more warm and fuzzies in 2012 than you thought possible.

step 1: cut paper in to strips 1″ wide by 10″ long.  these strips of paper will make up the links of your chain. you’ll need 12 links total.

step 2: stamp each link with a month of the year.

step 3: on the reverse side write your monthly resolution.

step 4: connect each individual link month by month to make your  chain. double sided tape works perfectly as an adhesive.

now hang your chain somewhere you will see (and be inspired by) it daily!

every month take off one link, read your resolution, and act on it! be realistic about your resolutions.  you don’t want to set your self up for failure.  while “bring about world peace” is a very lovely sentiment and a worthy challenge, “go vegan for the month” is probably a little more likely. pick resolutions that you can easily conquer and ones that will leave you feeling good about yourself and your year.

once you have accomplished your resolution, replace that link with a new one. on the new link, write a few sentences about accomplishing your resolution. how did you feel, was it easy or hard, would you make this resolution again, have you gained a new hobby or outlook because of this resolution?  at the end of the year your chain of resolutions will have become a chain of experiences and memories you can look back on and relish! xo, lexi + lo.

Read Full Post »

i love love love keeping a daily journal.  i can barely survive without a place to jot down diy and craft brainstorms, recipe experiments, outfit ideas, notes on music, movies, books, and art that are currently inspiring me, and thoughts on my day. alas, sometimes life just gets in the way of my creative endeavors and i often find myself going days or even weeks without cracking open my journal.  so when i saw this perpetual calendar/journal on one of my favorite blogs last month, i immediately put it on my diy to-do list. this condensed little journal is an adorable and simple way to keep a day by day account of my life year after year (and makes one pretty darn cute desktop calendar).

well, imagine just how tickled pink i was to wake up Christmas morning and find a perpetual calendar of my very own underneath the tree! my super creative and so very sweet mom was inspired by the same diy post and immediately thought of me.  what a thoughtful and oh so special handmade gift! i think it might be my favorite gift i received for Christmas and i can’t wait to make a few to give as presents throughout the year!

i now have a new ritual every night: i settle in with a cup of sleepy time tea and recount my day in a few lines on my calendar/journal. i’m beginning to really value this quiet time for reflection. no thoughts of unfinished projects, or projects yet to be started, or that giant pile of laundry that’s taking over the corner of my bedroom.  just a few minutes to focus completely on myself.   and every night i feel inspired to make the most of the following day. i mean, who wants to look back years later and yawn over their entries!? (ahem…see photo of yesterday’s entry below. whoops!)

here is a link to the step by step how-to so you make a perpetual calendar of your own.  using vintage postcards is an adorable way to separate each month but i might use vintage wall paper or contact paper glued to card stock instead when making my own.  get creative with yours and share your ideas with us!  as always, we love to hear what you’re working on! xoxo, Lo

ps. thanks for the inspiration and this oh so sweet gift, mama!

Read Full Post »

the week before Christmas can be a wee bit stressful. ok, it can be a lot bit stressful. one cause of such stress is the realization that you have many, many more gifts to give than you thought. while you love the daylights out of your friends and family, it can get a little overwhelming when you want to give someone a gift and simply do not have one in mind or on hand. this, however, is no longer a problem for you.

clove orange ornaments are cute, smell amazing, and take 8 minutes to make. you can do this.

you need:

whole cloves (they will be shaped like little tacks)

an orange (or tangerine, or clementine)

needle and thread

to do:

working in a pattern of your choosing, poke the cloves into the orange. they’re naturally tack-shaped, so this is super easy. i would imagine that it helped having a pretty ripe tangerine, as the peel wasn’t too hard.

once you’re done, thread a fairly thick needle with embroidery thread and sew into the fruit, making a loop from which to hang it from.

wrap it up, and voila!

we’ll be coming to your rescue with more great last minute gift ideas this week, so keep an eye on us!
xo

lo & lexi

Read Full Post »

painted lace ornaments

handmade gifts are always the most special gifts to receive.  and to give!  if you’re looking for a simple and sweet handmade gift to hand out this holiday season try these painted lace ornaments. they are so super simple to make and look so super lovely hanging from a tree!  for this project you will need a 3″ wooden embroidery hoop, lace (or doilies), spray paint in a festive color (we chose gold and pink), and scissors.  *note: even though its chilly out, do all the spray painting outdoors or in a well ventilated area!

step 1: fit the lace in the embroidery hoop. make sure to keep the lace taught as you tighten the hoop. ~ step 2: trim the excess edges of lace. now you’re ready to a paint!

step 3: spray an even coat of paint using a back and forth motion across the front and sides of the hoop ~ step 4: wait for the front to dry (about 2 minutes).  then turn over and repeat step 3 on the back side of the loop

hang the ornament in your tree or use the ornament on the outside of a present to make your gift wrapping extra special!

Read Full Post »

i love getting my home ready for the holidays but store bought decorations can leave a little bit to be desired (ie. cheap and chintzy or pretty but pocketbook breaking). opting for hand made when it comes to decking your halls feels more special and leaves you with more pennies to buy presents! this festive mini-stocking bunting was so super easy to make and i used supplies i already had lying around my house.

supplies needed:

  •  fabric. i recommend picking fabrics in different patterns with a limited color palate. i used vintage sheets that i already had lying around my house.
  • twine (the twine will run between and connect the mini-stockings)
  • fabric glue

decide on the shape and size you want for your stocking, sketch it on to a piece of card stock, and cut it out.  this is your stocking pattern. making sure that your fabric is facedown, trace your stocking pattern.  then turn the pattern over and trace it again.  you just created the outline for the front and backing of your mini-stocking!

lie the front piece of stocking face down and cover it in a thin layer of fabric glue.  i like to use a paintbrush to spread the glue to all of the edges. place your twine along the top, align the back piece of stocking with the front, press them together and then smooth out any bumps and wrinkles.  make sure the edges are pressed firmly together and the twine is secure!

now continue to repeat until the bunting is your desired length!

now to finish trimming my tree! what’s your favorite part of decorating for the holidays? xo!

Read Full Post »

Older Posts »